Ever wanted a dessert that’s both tasty and easy to make? These no-bake dessert bars are your new go-to. They taste like gourmet peanut butter cups but are super simple to make with just five ingredients.
Chocolate peanut butter bars are perfect for a quick, rich dessert without baking. They mix rich chocolate with creamy peanut butter for a treat that everyone will love.
Key Takeaways
- Requires only 5 ingredients
- No baking necessary
- Ready in under 30 minutes
- Perfect for chocolate and peanut butter lovers
- Can be made ahead of time
Our easy recipe turns simple ingredients into a stunning dessert. It looks like you spent hours cooking. These bars are great for parties or a quick dessert craving.
The No-Bake Chocolate Peanut Butter Bars Everyone’s Obsessed With – Here’s Why!
For dessert lovers, finding the perfect easy sweet treats is a big deal. These no-bake chocolate peanut butter bars are the ultimate sweet fix—rich, creamy, and downright addictive.
They’re simple to make and pack a big flavour punch. Plus, they satisfy your sweet tooth in no time.
These bars offer an amazing sensory experience. Each bite takes you on a journey—velvety textures, bold chocolate, and rich peanut butter flavour in perfect harmony. It’s a taste adventure that will make you smile.
Smooth, processed peanut butter is best for these no-bake treats. Brands like Jif or Skippy offer the perfect mix of consistency and flavor.
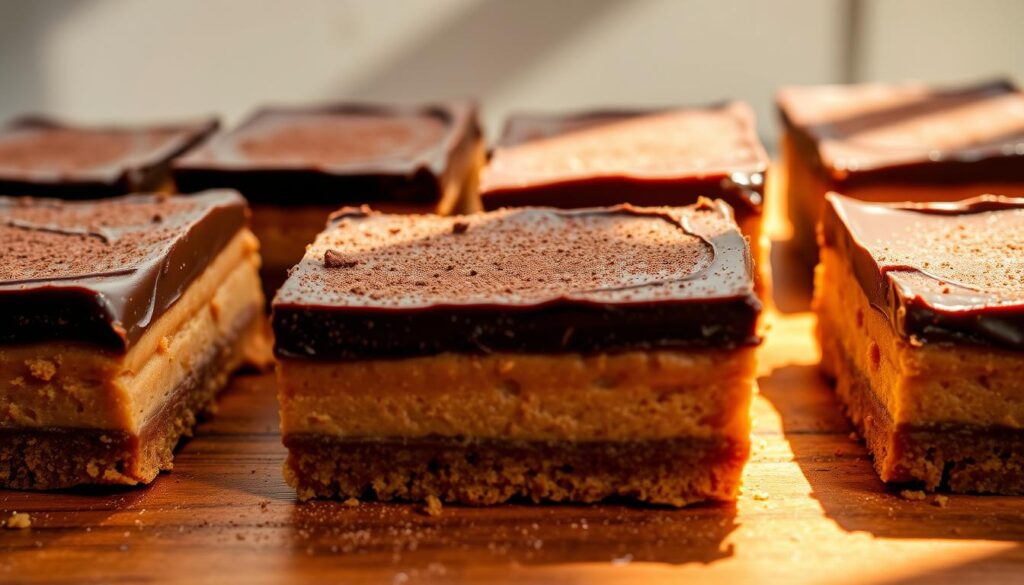
Perfect Texture and Taste
What makes these bars special is their amazing texture. You’ll get:
- A fudgy peanut butter base
- Smooth chocolate topping
- Creamy consistency like Reese’s Peanut Butter Cups
- Rich, decadent mouthfeel
Time-Saving Benefits
For those who are always on the go, these bars are a blessing. They don’t need an oven, saving you time and effort. You can whip up a delicious dessert in just 15 minutes.
| Preparation Time | Chilling Time | Total Time |
|---|---|---|
| 15 minutes | 2 hours | 2 hours 15 minutes |
Year-Round Enjoyment
Whether it’s a summer treat or a cozy winter indulgence, these bars are perfect all year round. Whether it’s a summer picnic or holiday treats, they’re always a hit. They’re versatile and sure to please any crowd.
Essential Ingredients for Perfect Peanut Butter Bars
Making tasty, quick chocolate desserts begins with picking the right ingredients. Your peanut butter bars will only be as great as the parts you pick. Let’s explore the key ingredients that will make your no-bake treat irresistible.

Choosing the Right Peanut Butter
Smooth, processed peanut butter is best for these no-bake treats. Brands like Jif Creamy Peanut Butter offer the perfect mix of consistency and flavour.
- Use creamy, processed peanut butter
- Avoid natural or separating peanut butter varieties
- Look for a smooth, consistent texture
Graham Cracker Options
Graham crackers are the base of your quick chocolate desserts. Traditional graham crackers are perfect, but you have other options for different diets:
- Regular graham crackers for the classic recipe
- Gluten-free graham crackers for sensitive diets
- Chocolate graham crackers for extra flavour
Chocolate Selection Tips
Your chocolate choice can make these peanut butter dessert bars amazing. Semi-sweet chocolate chips are the top pick, but feel free to try others.
“The right chocolate can transform a simple dessert into a gourmet experience.” – Pastry Chef
- Semi-sweet chocolate chips provide balanced sweetness
- Dark chocolate offers a richer, more intense flavour
- Milk chocolate creates a sweeter, smoother topping
Try different chocolates to find your favourite mix in these quick and tasty no-bake bars.
Kitchen Tools and Equipment Needed

To make delicious no bake sweet recipes, you need some basic kitchen tools. For the chocolate peanut butter bars, gather a few important tools. This will help you make your best dessert bar recipe a hit.
Essential Baking Equipment
- Baking Pan: An 8-inch or 9-inch square pan works perfectly
- Parchment paper or aluminium foil for easy bar removal
- Mixing bowls (medium to large size)
- Measuring cups and spoons
Choosing the right equipment is key to making smooth, professional-looking no-bake sweet recipes. Parchment paper is very important. It makes it easy to remove the bars and prevents them from sticking.
Chocolate Melting Tools
- Microwave-safe bowl
- Double boiler (alternative method)
- Silicone spatula for smooth mixing
There are two main ways to melt chocolate for your best dessert bar recipe. The microwave is quick and easy. For smooth, fuss-free melting, a double boiler offers the gentle, controlled heat your recipe deserves.
Pro tip: Always use low heat and stir often to avoid burning the chocolate. The right kitchen tools can turn a simple recipe into a professional-quality dessert.
Step-by-Step Preparation Method
Making a simple dessert for parties is now easier than ever! These no-bake chocolate peanut butter bars are a crowd favourite—loved by kids and adults alike!. They need little effort but pack a big punch in taste. Follow this easy guide to make a dessert that will wow your guests.
Creating the Peanut Butter Layer
First, gather what you need for this tasty treat. You’ll need:
- 1 cup melted butter
- 2 cups graham cracker crumbs
- 2 cups powdered sugar
- 1 cup + 4 tablespoons peanut butter
Mix the melted butter, graham cracker crumbs, powdered sugar, and 1 cup of peanut butter in a big bowl. Stir until it’s smooth and well-mixed. Press this mix firmly into a 9×13 inch pan. This will be the base for your chocolate and peanut butter bars.
Perfecting the Chocolate Topping
For the chocolate layer, aim for a silky finish. Mix the remaining 4 tablespoons of peanut butter with the chocolate chips. Melt them slowly, stirring constantly to avoid burning. Once smooth, pour the chocolate over the peanut butter layer.
Chilling and Setting Tips
Patience is key for perfect no-bake bars. Chill them for at least 2 hours, or until the chocolate is set. A sharp knife dipped in hot water helps cut clean squares.
Quick Tip: For the best texture, let the bars sit at room temperature for 5-10 minutes before serving to soften slightly.
Storage and Make-Ahead Instructions
Creating delicious homemade dessert recipes needs smart storage. Your no bake dessert bars can stay fresh and tasty with the right storage.
Refrigeration keeps your chocolate peanut butter bars perfect. They will stay delicious for up to a week if stored correctly.
Refrigeration Storage Guidelines
- Store bars in an airtight container
- Place parchment paper between layers to prevent sticking
- Keep refrigerated at 40°F or below
- Consume within 7 days for optimal flavour
Freezing Instructions
Want to make your homemade desserts last longer? Just pop them in the freezer for extended freshness and flavor!. It lets you make no bake dessert bars ahead of time.
| Storage Method | Duration | Thawing Instructions |
|---|---|---|
| Freezer Storage | Up to 3 months | Thaw overnight in the refrigerator |
| Wrap Method | Prevent Freezer Burn | Use plastic wrap and a freezer bag |
Pro Tip: Label your container with the prep date—it’s the easiest way to keep track of freshness and enjoy your treats at their best! When you’re ready to enjoy, remove the bars from the refrigerator 10-15 minutes before serving to reach the perfect consistency.
Expert Tips for Best Results
Making perfect no-bake chocolate peanut butter bars needs some skill. These quick desserts can be tricky, but with the right tips, you’ll get them right in no time.
Creating delicious desserts is more than just following a recipe. It’s about knowing the little things that make a good treat great. Here are some expert tips to make your no-bake bars stand out.
Common Mistakes to Dodge
- Always use well-stirred, smooth peanut butter for a consistent texture
- Avoid natural or overly oily peanut butter varieties
- Skip low-quality chocolate that won’t set properly
- Don’t rush the chilling process
Texture Troubleshooting Techniques
Getting the right texture in your treats is all about paying attention. Here are some tips that will change the game:
- Use a large, sharp knife for clean cuts
- Ensure bars are completely chilled before slicing
- For a no-mess release every time, line your pan with parchment paper—it makes lifting the bars a breeze!
- For the perfect texture and flavour, let the bars sit at room temperature for 5–10 minutes before serving.
Pro tip: If your desserts seem crumbly, check your ingredients and chilling time. Being patient is key to getting that smooth texture everyone loves.
Conclusion
If you’re into layered no-bake sweets, check out our Strawberry Shortcake Trifle – it’s just as easy and equally impressive.
These no-bake chocolate peanut butter bars are more than just dessert—they’re a bite-sized slice of indulgence, no oven required. They are a quick, delightful treat that turns your kitchen into a gourmet spot. They deliver the perfect blend of rich chocolate and silky-smooth peanut butter in every bite.
They’re perfect for any occasion, like a family gathering or a sweet snack for yourself. They impress guests with their taste, needing little effort. Anyone can make these bars, and they’ll look like a pro.
This recipe is super flexible. You can try different chocolates, peanut butter brands, or add unique toppings. Each batch lets you get creative while enjoying a delicious result.
Prepare to make a dessert that’s easy to make and loved by all. Your journey into no-bake desserts starts here.